Good morning!!! 大家早~
今天就接著上一節,繼續探討該如何做任務 (Task) 設定。
Step 1: Browser link to OpenVAS server then point to "Scan Management". Click "Tasks".
Step 2: Click "Star Button" then can see the page as below.
Step 3: Set a task name. (ex. Test Scan for 192.168.2.86)
Step 4: "Comment (optional)" column for more detail about this task.
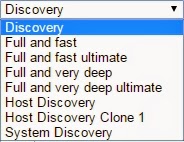
Step 5: For "Scan Config" select "Discovery" for default.
Tips: For this drop down menu list let you choose which method set for "Scan Config". (ex. Full and fast)
Step 6: "Scan Targets" for select the target to do scanning which we set last time. (ex. 192.168.2.86)
Step 7: "Order for target hosts" let you order target to scan when do more than one target scanning.
Tips: 3 ways to scan more than one target.
Step 8: "Network Source Interface" for setting port number. (ex. 80 or 8080)
Step 9: Finally click "Create Task" then can see a page as below.
當你看到如上圖,恭喜你!!!表示已經成功設定好一個任務了。
至於如何開始掃描 Target,只要按下如下圖的 "綠色 Play 鍵",就會開始掃描了。
到時候我們再來討論掃描後的結果,看看如何分析這份測試報告。
~ See you ~
參考出處:
http://www.openvas.org/


沒有留言:
張貼留言