今天就緊接著上一節 Load Impact 的介紹。
記得上一節介紹到 "無註冊版" 的使用方法。而這一節要介紹的 "註冊 Free版" 是從註冊、登入到測試方法,這都會在這一節做個說明。
而這兩種版本在使用上最大的差別在於 "註冊 Free版" 可以做細部設定,如錄製腳本(Scenario)和設定測試方法等。當然,如果要更進階的功能設定,如設定超過 250 VUs、測試時間超過5分鐘或是要在瀏覽器 Plug-in 錄製 Scenario 的功能 ...等等,這些都是需要額外付費的。

現在我們就從如何註冊帳號開始做說明:
Step 1: Link to http://loadimpact.com/ click "Sign up"

Step 2: Enter your Email & Password in yellow then click "Register account" in red.

Step 3: After sign up a new account show as below "Registration complete" in red.

Step 4: Before "Sign in" have to activated from your registered email as below in red.

Step 5: Enter your Email & Password in yellow then click "Sign in" in red.

Step 6: Enter your details as below in red then click "Save and continue" in yellow.

Step 7: After login into a main page as below.

Step 8: Click "User scenarios" in red then "Create user scenario" in yellow.

Step 9: Naming a "User scenario"(ex. Test Case 01) and "Script generation" (ex. http://www.hinet.net) in red.

Step 10: Click "Auto-generate"in yellow for created a new user scenario without detail setting.

Step 11: After auto-generate show as below click "Save" in red then completed to created a user scenario(ex. Test Case 01) in 2nd picture.


Tips 11-1: Click "Record session" in yellow then pop out "Test proxy setting" in red.

Tips 11-2: Before click "Test proxy setup" have to check proxy setting first as below.


Tips 11-3: After click "Test proxy setup" then click "Start recording" for record session.


Tips 11-4: After finish session record click "Stop recording" then click "Overwrite script"


Tips 11-5: Click "Save" to updated the modified scenario.

Step 12: After click "Start a new test" as below in red, enter the target URL or IP then click "Start test" will test like "unregistered version".

Step 13: After click "Advanced configuration" for more setting show as below page.

Step 14: Check above in red shows limitation for current subscription.
Step 15: Naming the test configuration and enter the target URL in red.

Step 16: Expand "Load test execution plan" for setting "Max VUs" and "Duration" with this test.

Tips 16-1: Click "Add step" for change load test plan, the chart will change automatically in yellow.

Step 17: "User scenarios" for setting more detail resource.


Step 18: "Server metrics agents" have to purchase.

Step 19: "Client and network emulation" for setting client and network type.


Step 20: "Extra setting" for add extra IP address.


Step 21: Click "Create test configuration and start test" for start test.


Step 22: Testing in processing.


Step 23: After test finished show as below in red then US cloud resource in yellow, Singapore cloud resource in blue.

Step 24: Check "Charts" for the VUs from US in orange, from Singapore VUs in yellow and the time of users to load time show in blue during this test.

Step 25: Check "Pages" show pages for this test scenario.

Step 26: Check "URLs" all successful then click "Next" for others.

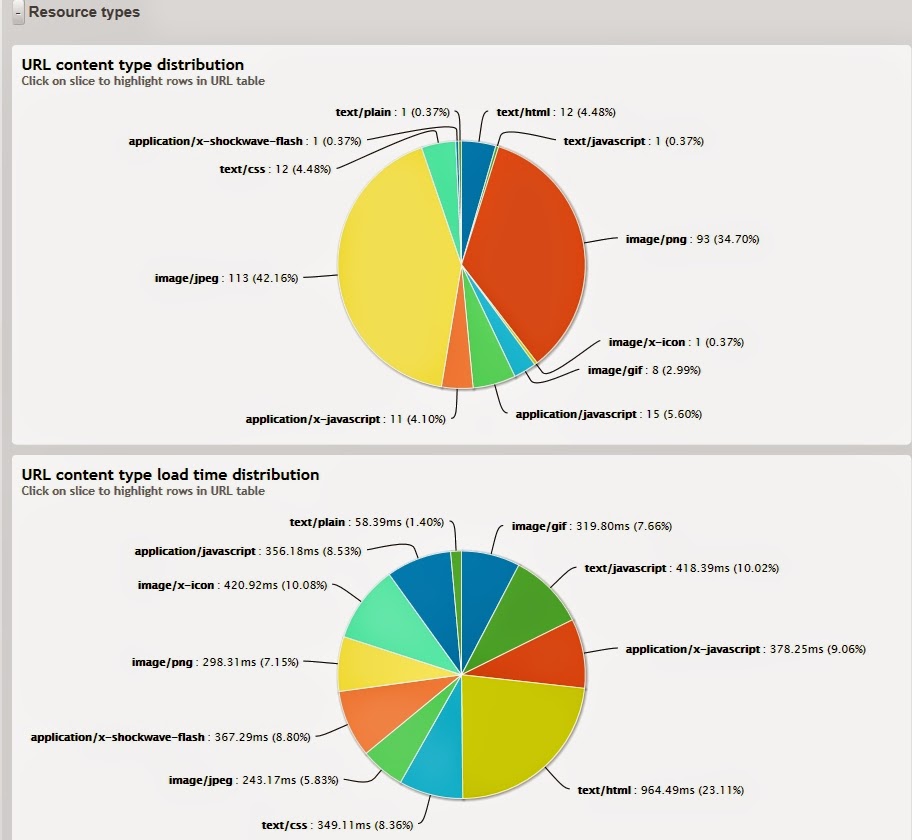
Step 27: Check "Resource types" for percentage of URL content type & load time.

Step 28: Finally Check "Logs" shows no log for this test.

說明到這裡相信大家對於 Load Impact 這套雲端測試工具,應該會有一定程度的瞭解。其實只要遵守測試的 VUs 不超過 250個,測試時間不超過5分鐘的這些限制,這是一套還蠻不錯的免費雲端測試工具。如果需要更多的測試環境設定,當然也就必須遵循使用者付費的原則,尤其是用在商業方面。
如果有機會的話,我們再來介紹別套不同的雲端測試工具。
Step 1: Link to http://loadimpact.com/ click "Sign up"
Step 15: Naming the test configuration and enter the target URL in red.
如果有機會的話,我們再來介紹別套不同的雲端測試工具。
~ See you ~
參考出處:
沒有留言:
張貼留言